3-D Safari

9:07 AM Posted In Edit This 48 Comments »


These 3-D safari cards are made from Taylored Artwork stamps. I taught this class at StampWorks, a wonderful local stamp store in Chandler, AZ and had the distinct honor of meeting Jim Taylor, the artist behind the images and also the owner of Taylored Artwork. Quite by accident, he came to the store while my class was in session. We had a great time in the class and it became even more fantastic when Mr. Taylor brought in a huge basket of over 100.00 worth of Taylored Artwork stamps that we GAVE AWAY in a drawing. One stamper went home VERY happy! Thank you Jim Taylor!!!

Now "how to": Images were stamped multiple times (Marvy Matchables black ink) then cut out and layered. Some layered pieces were molded and shaped by simply pulling the piece between my thumbnail and middle finger nail; the cardstock begins to curl with each pull. The pieces were attached with foam mounting tape to give them dimension. Colored with Prismacolor pencils and blended with Gamsol blending fluid. Backgrounds were made with cuttlebug embossing folders. NOTE: The horizontal lines on the base cardstock of the elephant card were made with a Scor-Pal www.scor-pal.com(my newest and now favorite tool!!).

At this time, I'm unable to locate a website for Taylored Artwork (I believe they no longer have one). His fabulous stamp line is avaiable from StampWorks 480-899-5958.

Thanks for looking!

Bad Hair Day

4:37 PM Posted In Edit This 7 Comments »


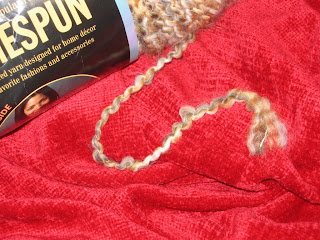
The next time you think you're having a bad hair day, think of this poor girl!! She's from I Brake For Stamps(The Merry Stamper line). The image is stamped with Memories black ink and colored with a paint brush and Marvy Matchable ink. I punched two 1/8" holes near the hairline and threaded a 1 1/2" length of yarn into each of the holes (Lion brand "Homespun" from Michael's or WalMart) and anchored them on the backside of the cardstock with scotch tape. Then, I took my stylus and made the hair by doing the following: Beginning at the rootline of the hair, I inserted the tip of my stylus between the plys of yarn and pulled it through the plys to the opposite end. I repeated this several times until I frayed both strands of yarn and turned them into wild hair. The teeny strands of string that hold the yarn together can be easily removed with your fingers, although it's not necessary. I placed a small amount of adhesive under the yarn "hair" to tame it a bit and to hold it in place. The background of this card is done with a Cuttlebug folder. Felt rick rack is from WalMart. Corner punches from Stampin'Up

Grannies Gone Wild

8:26 PM Posted In Edit This 5 Comments »


I Brake For Stamps has so many of these adorable images I never seem to be able to stop creating fun cards with them! Meet Granny, she's Gone Wild!! (Now that I think of it, maybe I DID see her in one of those videos~!!). So fun! Her hair is done with Liquid Applique which was applied and then heated with a heat tool. Strands of beads are from JoAnn's and the image was painted with Stampin' Up! markers. Enjoy!!

Martinis and Olives

7:44 PM Posted In Edit This 1 Comment »


I Brake For Stamps has turned me into an embellishing maniac with these images. I am having so much fun with these girls. You can find these on the IBFS website under one of their many companies, "The Merry Stamper". There is no end to the possibilites when it comes to embellishing these ladies! I thought this young lady was in desperate need of an olive or two for her martini so I did my part and made a couple for her. This image was colored with Marvy Inks and I added some sparkle to her drink with a 2-way glue pen and some glitter. The olives were made from circle punches and glued onto a round tooth pick. Cheers!! (Be sure to click on the photo for a larger version and you can really enjoy the bling on her drink!)

Tulle Lady

9:04 PM Posted In Edit This 2 Comments »


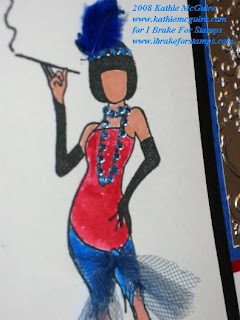
A fun and fabulous "I Brake For Stamps" image(www.ibrakeforstamps.com). I watercolored the image with Marvy Ink Pads and a paint brush. These stamps just BEG for embellishments and I did my best to due them justice. This lady has a small piece of tulle wrapped around her hips~I cut small slits alongside of the image and thredded it through each side and tied it in the front! Easy peasy. The strand of beads are from a.muse~I purchased them at Red Rubber Stamps in Glendale, AZ (602-298-8600). They are so cool because although they are individual colored rhinestones, they peel off in a strip making them SO easy to stick onto a small image like you see here. Silver and white cardstock is embossed with Cuttlebug folders and the rhinestone brads from Stampin' Up!

Duck Tape

4:49 PM Posted In Edit This
An old stamp that a friend GAVE me because she was getting rid of her stamp collection (don't fret, I bought a bunch so that's probably why she threw Mr. Duck Tape in with the deal). The company listed on the side of the stamp is Diamonds. Not sure if they're in business anymore but they were/are the company that has a little rhinestone inlaid on the top of every stamp. Bling! I got this stamp about 7 years ago and I finally just used him~poor guy! What brought him out of solitary confinement was the text stamp that you can't see inside the card. I saw it in a magazine and immediately ordered it. It goes like this:

Man's best friend
For years without fail
Has had four legs
A snout and a tail

All this has changed
To a new form and shape
Now his best friend
Is a roll of duct tape

I just loved the poem and ordered it from http://www.drs-designs.com Lots of other terrific stamps there too. I don't know who writes the poetry/greetings that they carry but WOW-ZA! Hallmark should be shaking in their boots! It's incredible stuff.

I colored the images, layered them onto some silver veined leatherette cardstock that I found on the floor in my step-dad's print shop many years ago (a stamper can't be TOO proud), added another layer of black and that's mounted onto some golden cardstock from my paper stash. The corners are paint chips that were punched with the Stampin' Up! corner punch and pierced with a push pin.

And to tie this work of art together, a beloved piece of REAL duct tape! I hope you enjoy!!

Jungle Parrots

9:12 PM Posted In Edit This

Image is "I Brake For Stamps" http://www.ibrakeforstamps.com/

Technique (for coloring the image) is something I learned at http://www.techniquejunkies.com/

I actually used two different stamps, both from I Brake For Stamps.
I stamped the image twice~my first image became the main one. The second image I used to cut up and add to the lower right hand corner of the card. The image at the upper left hand corner of the card was borrowed from another great I Brake For Stamps image~it's part of a gorgeous stamp featuring 3 cockatoos sitting on a branch in a similar jungle setting. It was fun to combine the two and I thought this was a nice way to get extra mileage out of two stamps!

I poked the holes with a push pin and used an awesome tool called a Fiber Friend from Timeless Touches. It's intended for use with fibers and stitching etc but I find it incredible for this use here. It's a plastic ruler with lots of great marks and holes that you can poke through. I like it for larger format cards like this one (5 1/2" X 6") because the ruler is about 12" long. A Google search will tell you who carries and sells them.

Enjoy!

Lace Dragonfly

8:25 PM Edit This
Card measures 6" X 6"
Background paper is from Michael's
Mulberry papers (both blue and white) is from local art supply store
Cardstock is Bazzill Basics
Corner embellishment is Cuttlebug die from silver cardstock
Ribbon is from Michael's
Silver string is Stampin' Up!
Oval punches are Stampin' Up!
Dragonfly image and text: Yvonne Albritton Designs http://www.yvonnealbritton.com/
I watercolored the blue mulberry paper a bit on the edges. I used a Stampin' Up! aqua painter and SU Night of Navy ink. I created the blue splatters with a children's Blo Pen that I bought at Michaels a long time ago. I stitched the edge of the background paper with my Janome Sew Mini Sewing Machine. After I handcut the dragonfly, I gently bent the wings upward and then pulled outward by holding the wing between my thumbnail and my middle finger to get them to arch and bend. Realistic looking!

Faux Pink Denim

8:25 AM Posted In Edit This

"Faux Denim" is what the background is called on this card. I learned the technique here: http://www.techniquejunkies.com/. It's a subscriber type group~WELL worth the few dollars it costs per month to join. I've been a member for about 5 or 6 years now and I just LOVE it!! The vellum heart was traced from a Paper Zone Template and cut out. I folded the flaps and secured them with Stampin' Up brads. The pink heart image was stamped with VersaMark ink onto pink cardstock, embossed with white EP, and colored (inside area) with a pink marker. I added some pink rhinestones from WalMart, cut it out and inserted it into the vellum pocket. The corners are die cuts from my Cuttlebug collection and the ribbon is from Michael's. The stitched edge was done on my Janome Sew Mini sewing machine. Enjoy!!

Time Well Spent

6:02 PM Posted In Edit This


A fun card I made with a new Stampin' Up! hostess set. I made it for a great stamping friend! The images are stamped with VersaMark and embossed with white embossing powder on vellum cardstock. They were then turned over, dry embossed with a stylus, and chalked~then attached to the card with pop dots. My friend LOVED it so "Mission Accomplished!!"

Santa Pants Paper Purse

7:13 PM Posted In Edit This

Introducing my latest original design, the "Santa Pants Paper Purse". Just in time for the holidays, this purse is perfect for a lightweight tote, a gift bag, or a festive holiday centerpiece! Fast, fun, and so easy to make. I hope you enjoy this creation and have lots of fun creating many of them. For a complete, FREE tutorial full of step-by-step photos (along with a printer friendly version), please visit my website: http://www.kathiemcguire.com/. For a direct link to the Santa Pants Paper Purse, just click here: http://www.kathiemcguire.com/Photoalbum9.html
Happy Holidays everybody!!!

By The Sea

8:16 AM Posted In Edit This
Card for a local swap group! Fun group~we meet once a month at a pre-determined restaurant. The swap theme is "By The Sea" and it matches the restaurant theme: this meeting will be at The Red Lobster. Cute, huh?
I made 12 of these: 8 for the swap and 4 for my card stash (for later use)~glad I did, too because I loved them when they were completed!
Paper: Miscellaneous
Ink: Pallette Black, The Angel Co.
Stamps: Fishy Friends, Stampin' Up!
Punches: Marvy Giga scallop and Marvy Mega scallop. Corner punch by Stampin' Up! (AWESOME tool, what did I ever do without this???)
Technique: Fish colored with SU markers and Prismacolor pencils. Pencils blended with Gamsol blending fluid. Two way glue pen (Michael's) used on fish and sprinkled with glitter (Sparkle and Sprinkle Co.)
Eyelets: Set with my latest toy, Crop-A-Dile. It rocks!!!
Cuddlebug embossing folder used on plain copy paper for the bubble background. Sewn with my new Janome sewing machine. Like it? BUY ONE!! It's one of the most wonderful addition to my stamp room in YEARS!!
Bling: A WOW find at WalMart. A big old bag of them for 3.99~they are adhesive backed and easy to apply, though time consuming. The "real" use for these gems, according to the package, is for application to cell phones. What do those marketing people know????? LOL Card measures 5 1/2" X 5 1/2"