Wild West Cowboy in Blue

9:49 PM Posted In Edit This

A card for a gentleman who is the agricultural administrator at a school for troubled teen boys. They are now the proud parents of a darling cow that I helped place with them (link for cow story in previous post labeled Wild West Cowboy).
Stamps: SU Wild Wild West
Technique: Gamsol and Prismacolor Pencils

Wild West Cowboy in Red

1:49 PM Posted In Edit This

A card for an Animal Crimes Investigator who works for the county Sheriff's Dpt. He helped me with a cow. Read about the cow here: http://www.eastvalleytribune.com/story/93130

Stamp Sets: Wild West (SU, retired), Weathered (SU)

Technique: Prisma Colored Pencils, Gamsol Blending Fluid

Learn how to use Gamsol here:

Savanna Name Frame

7:09 PM Posted In Edit This

A name frame for a precious little girl who has a Winnie The Pooh themed bedroom. Most supplies Stampin' Up! (exception: Winnie The Pooh related text and images which are stickers). Frame is from WalMart.

Golf Father's Day Card~FORE!

6:57 PM Posted In Edit This

A father's day card made for a friend to give to her hubby on Father's Day. Image is stamped with StazOn Timber Brown and watercolored with Stampin' Up's Watercolor Crayons (love those things!!). Colors coordinated with the assistance of one of my all time favorite stamping tools, SU's Color Coach. Happy Father's Day to all of you fathers!!

Super Bella in Teal

5:40 PM Posted In Edit This

With a little nudge from my good friend, Gwen Mangelson, I'm finally updating my blog! Yippee!!
Here's a cheeky little card I made from a pile of odds-n-ends and paper scraps. I stamped the background, then added a black marker outline, and lastly embossed with my new Cuttlebug embossing folder for the card base. I added a SuperBella image that I got in an image swap, found the perfect colors of Prima flowers and Voila!! Instant card!! I colored the image with Prisma colored pencils and blended with Gamsol (beware~unless you want to hopelessly hooked, don't try Gamsol. There's no turning back LOL).

Calendar for 2007

6:06 PM Posted In Edit This


2007 Calendar
(Thanks to my friend, Hetty Sanders in the Netherlands for this project idea that I've created and enjoyed for many years!!)
Ring in the new year with this 2007 Calendar project!!
1. Create the numbers on your computer and enlarge to fill a sheet 8 1/2" X 11" (or download a copy from Hetty's website): http://www.geocities.com/hetty4you)
2. Print onto an 8 1/2 X 11" sheet of cardstock.
3. Cut around (and inside of) each number.
4. Stamp, brayer, or embellish the cardstock to coordinate with the project.
Score inbetween each number, then "Z" or "Accordian" fold so the calendar will stand up.
5. Add any other stamped images and embellishments.
NOTE: I've added a 1 1/2" X 1 3/4" pre-made calendar I purchased at www.vippies.com. OR you can print your own little calendar on your computer and cut it out, staple, and there you go!!
I also found that I love the Prima paper flowers with a brad center on the calendars. I think it's the perfect touch!! Best place to buy them: http://members.cox.net/redrubberstamps/index.htm They have them for around $4.50 for a huge bag of assorted sizes and colors. I just can't get enough of them!!

3:52 PM Posted In Edit This


Brown Bag Card: Paper Bag Card
Kathie McGuire stampkathie@yahoo.com

Brown Paper Bag:
Costco

Paper (lady is stamped on):
Kraft Paper from a roll of packing kraft paper
Images:
“Art Impressions” for the lady and the hat image.
“Rubber Romance” for the text image.
Ink: Archival Ink, Sepia
Embellishments:
Tag is a die cut from Ellison. We cut it from chip board and just made it shorter in length so it would fit perfectly inside the bag.
Cloth "ribbon" is stretch gauze and was sponged with the Sepia ink.
Heart die cut from Sizzix “Primative Hearts” die. Cut from chipboard.
Mesh over the heart is drywall tape from Lowe's, sponged with Sepia ink.
Staples on top of the drywall tape are regular silver staples, colored with a brown Sharpie pen. I hand drew the stitches around the edges with a brown marker

Halloween Popcorn Hands

10:39 AM Posted In Edit This


“Halloween Popcorn Hands”
©Copyright 2006 Kathie McGuire
stampkathie@yahoo.com

Begin with a clear plastic glove (like the ones used for handling food). As a second choice, a latex glove (like the ones used in the medical profession) will work although not as transparent, so opt for the clear gloves if you can find them. I bought mine at the dollar store~there were 100 in the package. If you choose the latex gloves, be sure that your glove is NOT powdered inside in case your recipient wants to eat the popcorn.

Begin by filling the glove with popped popcorn. Tie the top of the glove with a rubber band or a twist tie.

Prepare a tag and ribbon and attach the tag to the top of the glove with the decorative ribbon so that it covers the rubber band or twist tie. (tags made on the “Your Life A to Z” show were made with a Sizzix die cutter and the “Scalloped Pocket Tag” and “Ghosts” die cuts).

I purchased fake fingernails in the Halloween aisle at a retail store. I used the glue tabs that came in the package to attach the nails to the plastic gloves. I bought the skull rings but could only find them in white~that didn’t show up very well on the fingers. A quick spray with a can of regular black spray paint worked like a charm. The rings were small (probably made for children’s size fingers) so I snipped the band of the ring with scissors and opened them up and just placed them on each ring finger of the hands.

Like this project? OK then, give me a hand!!! Happy Haunting!!

"Tips, Techniques, and Secrets of the Paper Crafting Pros"

10:25 AM Edit This
Don't forget about my new 2 book set on CD: "Tips, Techniques, and Secrets of The Paper Crafting Pros" (for more info, scroll to the end of the Blog or click on the book's title on the left hand side of the screen).

Pencil Pouches

9:50 AM Posted In Edit This


Pencil Pouches
©Copyright 2006 Kathie McGuire

Supplies:
Ribbon
Ink Pads
Crimper
Rubberstamps
Scoring tool
Decorative Button
Decorative Scissors
5 ½” X 8 ½” piece of cardstock
Two sided tape (the heavy duty type)

Begin by scoring the cardstock lengthwise at 2” and 4”. Fold the cardstock and crease on the scored lines. Unfold and lay flat, then stamp/decorate .On the unstamped side, apply two sided tape along the BOTTOM edge. Then, apply two sided tape along the edge of the section that measures 1 ½”. Fold the cardstock at the scored lines and press to secure the pencil pouch along the edges with the two sided tape. Next, crimp the end of the pencil pouch to approximately 1”. Then, cut the pouch top with the decorative scissors to create an interesting edge. Insert two pencils into the pouch and finish with the decorative ribbon and coordinating button.

Kathie's Comments: These pouches are fabulous gift giving projects for more than just pencils! Here are a couple of ideas (see the photos for a great visual): Nail files/Emery Boards (how about for your favorite nail tech?), Combs (a very clever idea for a hair stylist or a great gift idea for the motorcyclist in your life suffering from the dreaded "helmet head hairdo"), Paint Brushes (for the aspiring artist in your life), or a Bookmark (for your bookworm friend). You are only limited by your imagination for the contents and theme of this great gift giving packaging!!

Bonus Tip: Most craft stores and other retailers carry a variety of "theme related" pencils (dog paw prints, holiday images, etc) so take advantage of the product by making a coordinating pencil pouch for your theme related pencil (see the "Zebra" theme pencil pouch in the photos. Also the "Dog" theme pencil pouch. Both pencils were purchased in a craft store).

Big Bonus Tip: Don't have a pencil to match your color theme? Paint it with acryclic paint! It only takes a few minutes and WOW, what a difference. For a great example of painted pencils, see the mauve "Letter Writing" theme pencils above. They were painted with a paint brush and an inexpensive acrylic paint available in most craft and retail stores. Then, the second coordinating color was simply sponged on with a make-up sponge. (As a note, there is no need to sand or prep the pencils first.)An instant color match and a great way to make your project look like it came from a chic boutique!!

Stationery Pocket Folder Gift Set~Tutorial

5:13 PM Posted In Edit This 3 Comments »


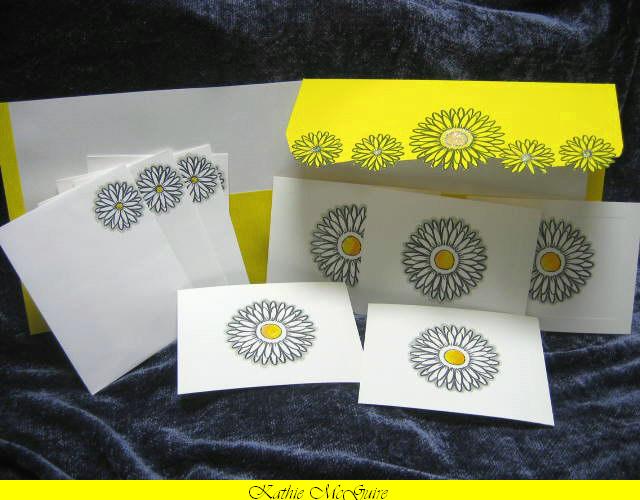
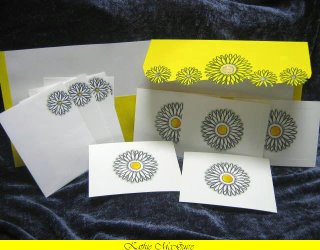
Pocket Folder Stationary Set
as seen on "Your Life A to Z" September 5, 2006
Supplies:
Ruler
Pencil
Ribbon
Scissors
Stylus or bone folder
9” X 12” pocket folder
5 sheets of 8 ½” X 11” white 20# bond
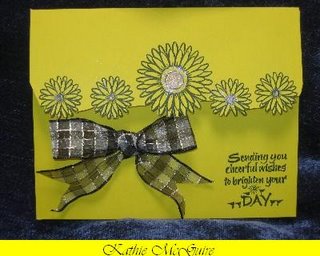
Large Stamp and coordinating smaller stamps
Ink pads in color to coordinate with the folder
5 A-2 envelopes (white or any color to coordinate with project)

Create the folder:
On the front of the folder, measure 7” from the bottom and mark a small pencil mark on the right edge of the folder. Repeat on the left side of the folder. Make a horizontal pencil mark across the folder at the 7” marks.

With scissors, cut the folder from the right edge to the left, stopping at the folder’s spine. From the top edge of the folder, cut along the spine, stopping at the horizontal cut. Remove that portion of the folder and set aside.

On the back of the folder, score a horizontal line from left to right at the 7” mark. Then, fold the back portion over the front to create a flap.

Stamp the flap of the folder with a large stamp or decorate as you desire.

Create the stationary pieces:
· Cut 8 ½” X 11” paper to 5 ½” X 8 ½”
· Stamp each sheet of paper with the smaller stamps
· Stamp each envelope with the smaller stamps

To complete the stationary gift set, place the letter sheets inside one of the folder’s inside pockets, and the envelopes in the other pocket.

Kathie’s Comments:
Here are a few ideas:
Secure the folder flap with a small piece of hook and loop tape on the back side of the folder flap. Place the opposite piece of the tape on the folder body.
Hold the folder closed with a piece of ribbon tied on the left side and another piece tied on the right side.
Secure the folder flap by using the same method as the ribbon, except elastic cord.
Add interest to the folder flap’s corners with corner punches
Add a nice decorative edge to the folder flap by cutting with decorative scissors.

Photo Purse

10:42 PM Posted In Edit This 2 Comments »


Photo Purse
Copyright 2006 Kathie McGuire stampkathie@yahoo.com

Main Body of Purse
Section 1: (1) 5” X 11” piece of cardstock scored at 5” and 10”
Section 2: (1) 5” X 10” piece of cardstock scored at 5”

Purse Flap
(1) 3 ½” X 5 ¼” piece of cardstock scored at 1 ½”

Outside Back Cover
(1) 5 ¼” X 5 ¼” piece of cardstock

Outside Front Cover
(1) 5 ¼” X 5 ¼” piece of cardstock

Assembly
Fold sections 1 and section 2 at the score lines.

Attach section 1 and section 2 together by gluing the 1” section of the cardstock on section 1 to section 2. Accordion fold.

*Here’s a GREAT tip: Hold the cardstock vertically and let it slightly expand. From the side, it should look like a “W”. Then, attach the outside front and outside back covers. This insures that the photo purse will be constructed properly. Now continue…………

Glue the outside back cover to the last piece of the main body. Glue the outside front cover to the first piece of the main body.

Attach the purse flap to the outside back cover and fold over. Apply hook and loop tape for closure. For an added flair, cut the purse flap to a point or punch the corners with a decorative punch. .

Glue a 30” piece of ribbon at the middle fold, back side of photo purse. Wrap around to the front and tie in a knot to form a handle.

Fill with your favorite photos and ENJOY!!